Trees in C#
Introduction
Table of Contents
Trees are a fundamental data structure in computer science, widely used for organizing hierarchical data efficiently. In C#, trees play a crucial role in search operations, data indexing, and decision-making processes. Whether you’re working on file systems, game development, or database indexing, understanding trees will help you write more efficient and scalable applications.
In this tutorial, we’ll explore tree structures in C#, covering their basic concepts, implementation, and common operations. You’ll learn how to create and traverse trees, making it easier to manage complex data relationships in your projects. Let’s get started!
Objectives
In this lesson and tutorial, our goal is to provide you with a clear and structured path to understanding and working with trees in C#. Trees are a crucial data structure for solving complex problems, and by the end of this guide, you’ll be equipped with the knowledge and skills to confidently use them in your projects. Our objectives are designed to help you progress from foundational concepts to practical implementation:
- Understand: Gain a clear understanding of what trees are, their components (like nodes, roots, and leaves), and their role in organizing hierarchical data.
- Learn: Explore the different types of trees, such as binary trees, binary search trees, and more, along with their unique properties and use cases.
- Practice: Get hands-on experience by writing C# code to create tree structures and perform essential operations like traversal, insertion, and deletion.
- Apply: Apply your knowledge to real-world scenarios, such as building a file system, implementing search algorithms, or solving problems that require hierarchical data organization.
By focusing on these four objectives, you’ll not only grasp the theory behind trees but also develop the practical skills needed to implement them effectively in your C# applications. Let’s get started on this journey to mastering trees!
Source code example
Explanation
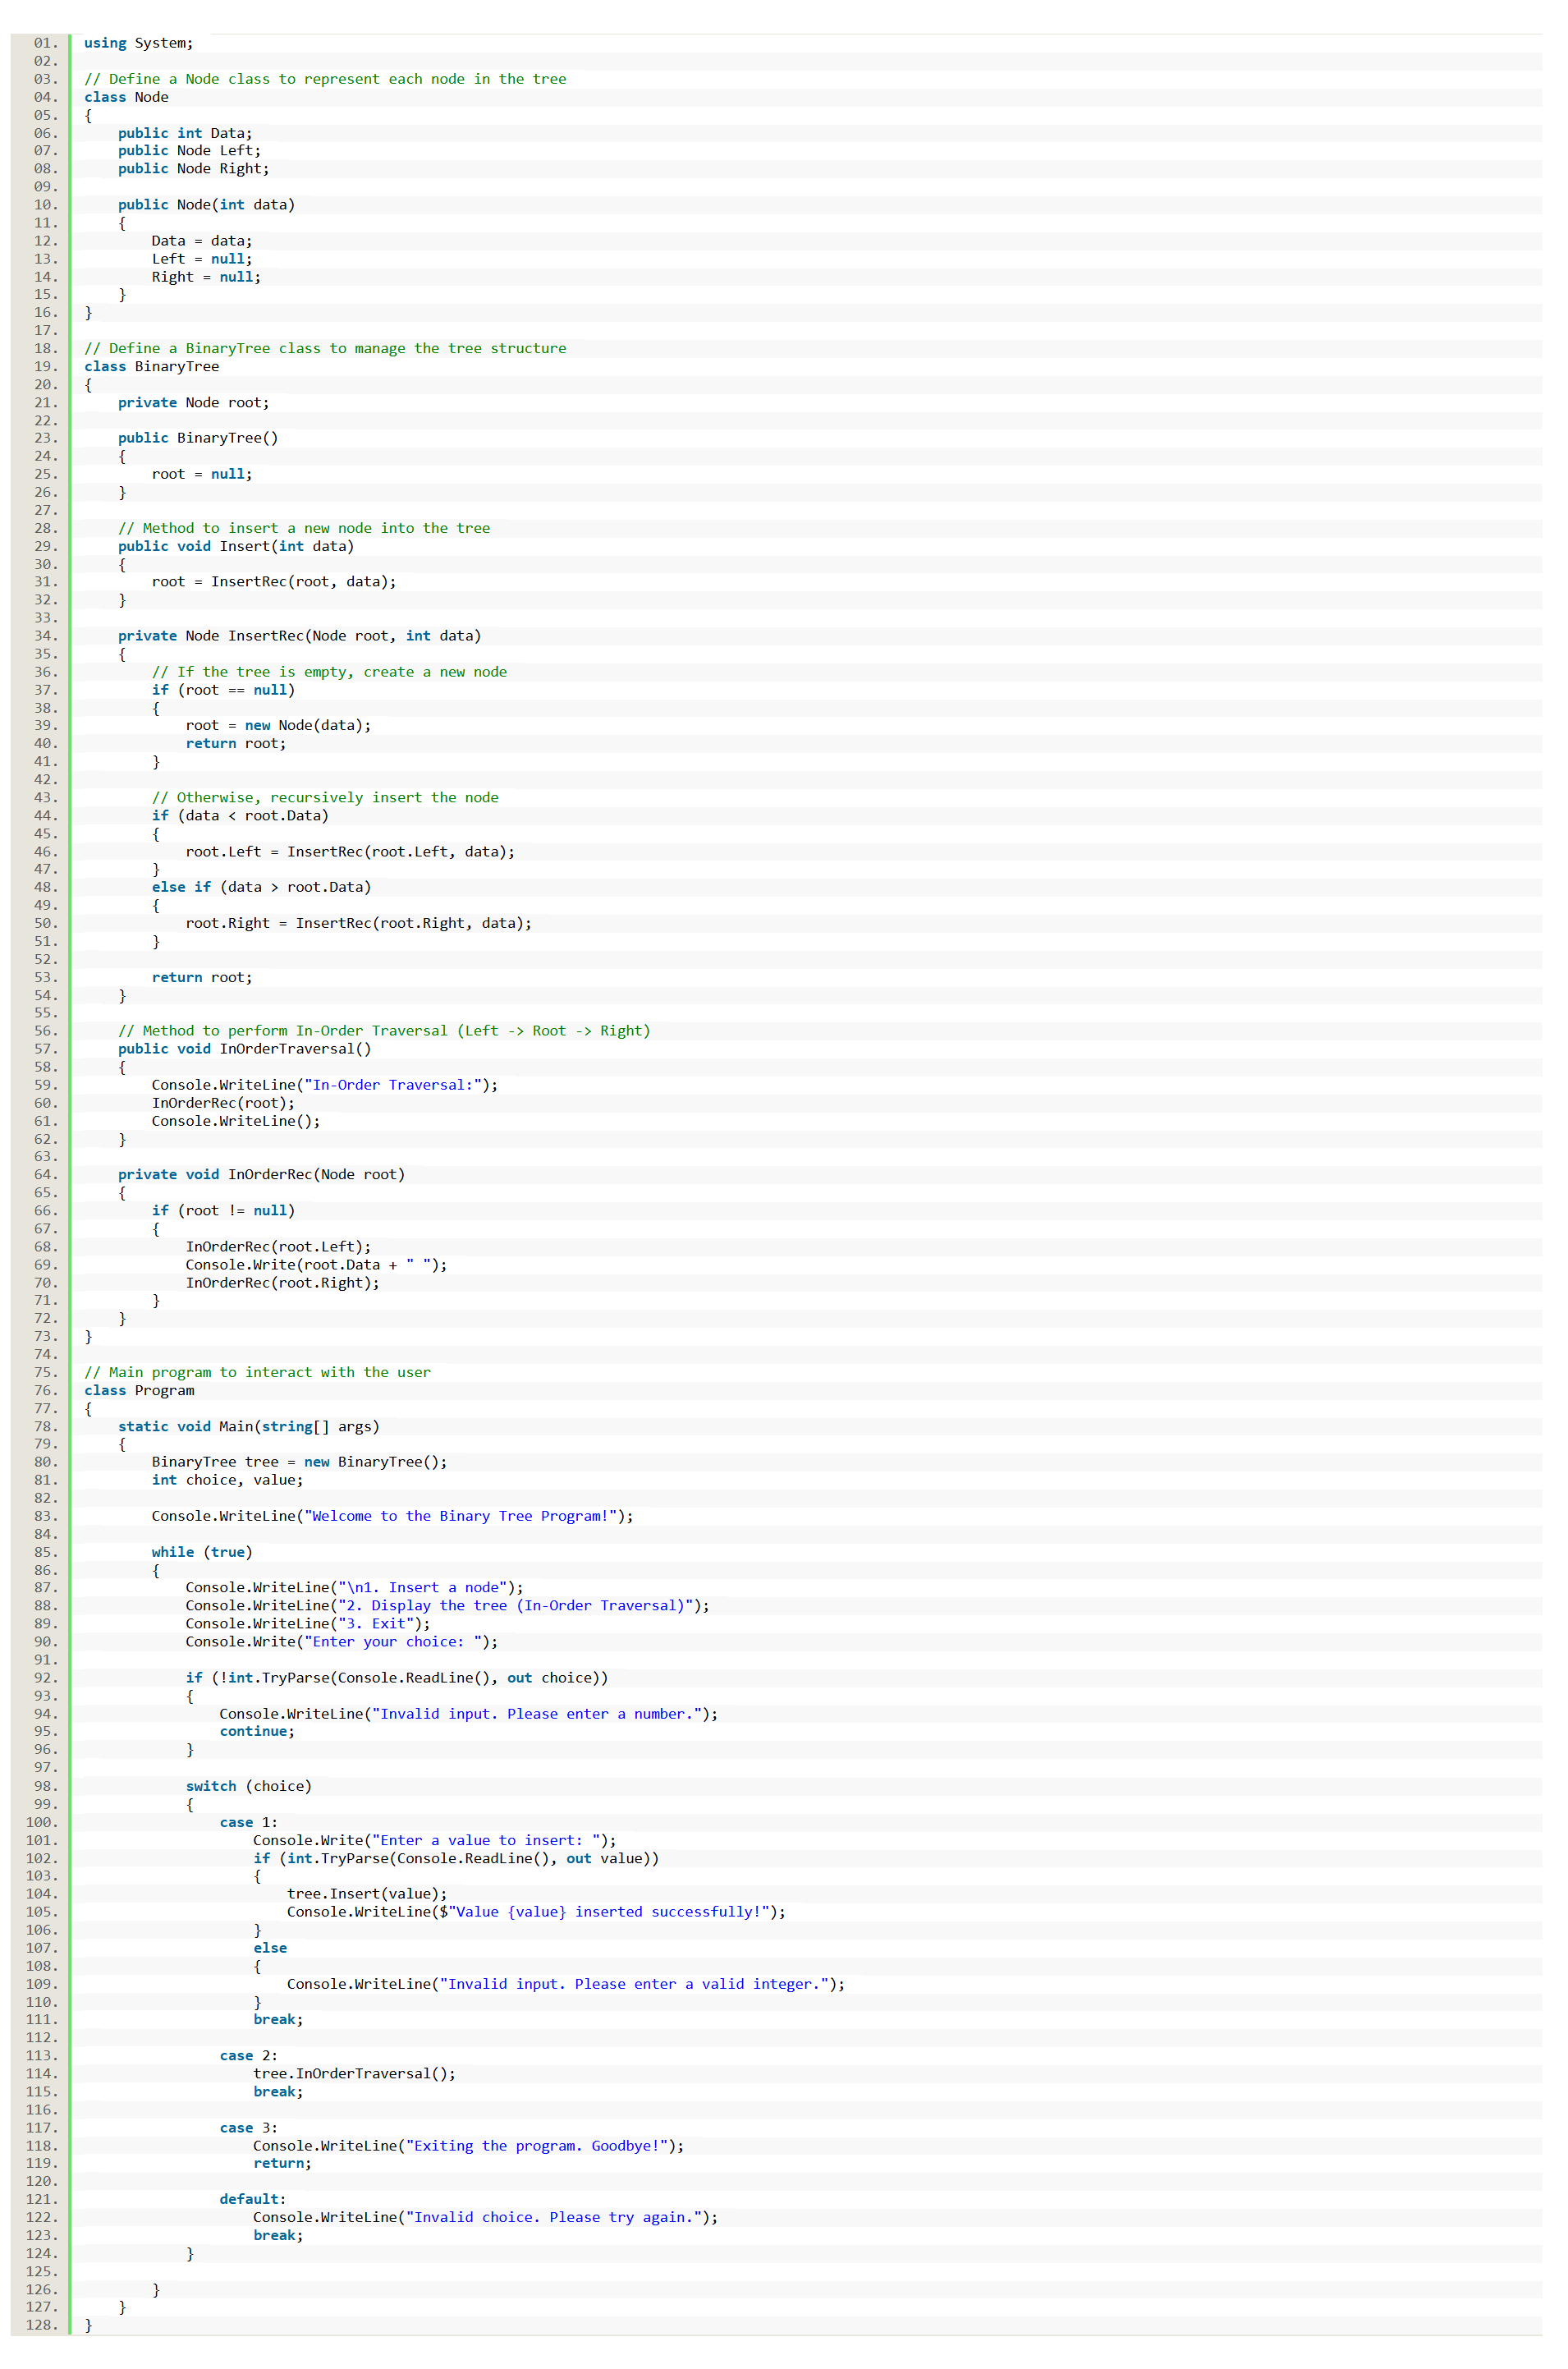
This C# program implements a simple Binary Tree with user interaction. Here’s a step-by-step explanation of how it works:
- Node Class
- Represents a single node in the binary tree.
- Each node contains:
- Data: The value stored in the node.
- Left: A reference to the left child node.
- Right: A reference to the right child node.
- The constructor initializes the node with the given data and sets Left and Right to null.
- BinaryTree Class
- Manages the binary tree structure.
- root: The topmost node of the tree (initially null for an empty tree).
Insert Method
- Insert: Public method to insert a new value into the tree.
- InsertRec: A recursive helper method that:
- If the current node (root) is null, creates a new node with the given data.
- If the data is less than the current node’s data, recursively inserts it into the left subtree.
- If the data is greater than the current node’s data, recursively inserts it into the right subtree.
- Returns the updated node.
In-Order Traversal
- InOrderTraversal: Public method to display the tree’s contents using in-order traversal (Left -> Root -> Right).
- InOrderRec: A recursive helper method that:
- Traverses the left subtree.
- Prints the current node’s data.
- Traverses the right subtree.
- Main Program
- Creates an instance of BinaryTree.
- Displays a menu for the user to:
- Insert a value into the tree.
- Display the tree using in-order traversal.
- Exit the program.
- Handles user input and performs the corresponding operation using a switch statement.
- Validates user input to ensure it is a valid integer.
How It Works:
- The program starts by creating an empty binary tree.
- The user can:
- Insert values into the tree.
- Display the tree’s contents using in-order traversal.
- Exit the program.
- The tree maintains its structure based on the rules of a binary search tree (left subtree < root < right subtree).
Example Run
Welcome to the Binary Tree Program!
-
Insert a node
-
Display the tree (In-Order Traversal)
-
Exit
Enter your choice: 1

Enter a value to insert: 10

Value 10 inserted successfully!
-
Insert a node
-
Display the tree (In-Order Traversal)
-
Exit
Enter your choice: 1

Enter a value to insert: 5

Value 5 inserted successfully!
-
Insert a node
-
Display the tree (In-Order Traversal)
-
Exit
Enter your choice: 1

Enter a value to insert: 15

Value 15 inserted successfully!
-
Insert a node
-
Display the tree (In-Order Traversal)
-
Exit
Enter your choice: 2

In-Order Traversal:

5 10 15
-
Insert a node
-
Display the tree (In-Order Traversal)
-
Exit
Enter your choice: 3

Exiting the program. Goodbye!
Summary
In this lesson, we explored the fundamentals of trees in C#, a hierarchical data structure widely used for organizing and managing data efficiently. We started by understanding the basic components of a tree, such as nodes, roots, and leaves, and then implemented a simple Binary Tree in C#. Through hands-on coding, we learned how to insert nodes into the tree and perform an In-Order Traversal to display its contents. The program also included user interaction, allowing users to dynamically insert values and visualize the tree structure. By the end of this lesson, you’ve gained both the theoretical knowledge and practical skills to work with trees in C#, setting a strong foundation for tackling more advanced tree-based algorithms and applications.
Exercises and Assessment
To solidify your understanding of trees in C# and improve your coding skills, this lab exam presents a series of exercises designed to challenge and expand your knowledge. Building on the basic binary tree implementation you’ve already created, these tasks will encourage you to add new features, optimize your code, and explore advanced tree operations. By completing these exercises, you’ll not only reinforce your understanding of tree data structures but also gain practical experience in writing efficient and robust C# programs. Let’s dive into the exercises and take your binary tree implementation to the next level!
Lab Exam Exercises
- Add Pre-Order and Post-Order Traversal
Extend your binary tree implementation to include Pre-Order (Root -> Left -> Right) and Post-Order (Left -> Right -> Root) traversal methods. Allow the user to choose which traversal method to display. - Implement a Search Function
Add a method to search for a specific value in the tree. If the value is found, display a success message; otherwise, inform the user that the value does not exist in the tree. - Delete a Node from the Tree
Implement a function to delete a node from the tree. Handle the three cases:- Deleting a leaf node (no children).
- Deleting a node with one child.
- Deleting a node with two children (replace it with the in-order successor).
- Calculate the Height of the Tree
Write a method to calculate and display the height of the tree (the number of edges on the longest path from the root to a leaf). - Count the Number of Nodes
Add a feature to count and display the total number of nodes in the tree. - Validate if the Tree is a Binary Search Tree (BST)
Implement a function to check if the tree satisfies the properties of a Binary Search Tree (BST), where the left subtree contains only nodes with values less than the root, and the right subtree contains only nodes with values greater than the root. - Balance the Tree
Optional Challenge: Implement a method to balance the tree (e.g., using an AVL tree or Red-Black tree approach) to ensure optimal performance for search, insertion, and deletion operations.
How to Approach the Lab Exam
- Plan Your Solution: Break down each exercise into smaller steps and plan your approach before coding.
- Test Incrementally: After implementing each feature, test it thoroughly to ensure it works as expected.
- Refactor Your Code: Look for opportunities to improve your code’s readability, efficiency, and structure.
- Challenge Yourself: If you finish the required exercises, try the optional challenges to deepen your understanding.
You may visit our Facebook page for more information, inquiries, and comments. Please subscribe also to our YouTube Channel to receive free capstone projects resources and computer programming tutorials.
Hire our team to do the project.