Basic Try-Catch Block in C#
Introduction
Table of Contents
In this tutorial, we’ll explore the basics of using the try catch block in C#. Exception handling is an essential aspect of writing robust and error-free code, allowing developers to catch and manage runtime errors gracefully. By implementing a try-catch block, you can prevent your application from crashing unexpectedly and provide meaningful error messages or alternative solutions. Whether you’re new to C# or looking to reinforce your understanding of exception handling, this guide will walk you through the key concepts and provide a simple, beginner-friendly example.
Objectives
This tutorial aims to equip you with a solid understanding of try-catch blocks in C#. Through this learning experience, you will be able to:
- Understand: Grasp the fundamental concepts of exceptions and their role in C# programming.
- Learn: Acquire proficiency in the syntax and usage of try-catch blocks for effective error handling.
- Practice: Apply your knowledge through hands-on exercises and examples, reinforcing your understanding of try-catch blocks.
- Apply: Integrate try-catch blocks into your own C# projects to improve code reliability and user experience.
By actively engaging with these objectives, you’ll be well-prepared to leverage try-catch blocks as a valuable tool in your C# development journey.

Source code example
using System;

namespace TryCatchExample
{
internal class Program
{
static void Main(string[] args)
{
try
{
// Ask user for two numbers
Console.Write("Enter the first number: ");
int num1 = Convert.ToInt32(Console.ReadLine());

Console.Write("Enter the second number: ");
int num2 = Convert.ToInt32(Console.ReadLine());

// Attempt to divide the numbers
int result = num1 / num2;

Console.WriteLine($"Result: {num1} / {num2} = {result}");
}
catch (DivideByZeroException)
{
// This block handles division by zero
Console.WriteLine("Error: Cannot divide by zero.");
}
catch (FormatException)
{
// This block handles invalid number input
Console.WriteLine("Error: Please enter valid numbers.");
}
finally
{
// This block runs no matter what, often used for cleanup
Console.WriteLine("Thank you for using our calculator.");
}
Console.ReadKey();
}
}
}
Explanation
Breakdown:
- Namespace and Class:
- The program is defined under the namespace TryCatchExample and inside the Program class. This is a typical structure for C# programs.
- Main Method:
- The entry point of the program is the Main method. This is where the program starts executing.
- Try Block:
- The try block contains code that might cause an exception.
- The user is asked to input two numbers. The inputs are then converted from strings to integers using Convert.ToInt32().
- The code attempts to divide the two numbers and print the result. If both inputs are valid and the second number is not zero, the division will work fine.
- Catch Blocks:
- The catch (DivideByZeroException) block handles cases where the user tries to divide by zero. In this case, the program will output an error message: “Error: Cannot divide by zero.”
- The catch (FormatException) block catches situations where the user inputs non-numeric data. If the conversion fails, the program will display: “Error: Please enter valid numbers.”
- Finally Block:
- The finally block will always execute, whether or not an exception occurs. It’s commonly used for cleanup tasks or final messages. Here, it displays: “Thank you for using our calculator.”
- Console.ReadKey():
- This line waits for the user to press a key before closing the console window, so they have time to read the output.
How to Run and Execute the Program
To run this program, follow these steps:
Step 1: Install Visual Studio (If not already installed)
- Download and install Visual Studio.
- Choose the .NET Desktop Development workload during installation to set up C# development.
Step 2: Create a New Project
- Open Visual Studio.
- Click Create a new project.
- Select Console App (.NET Core) or Console App (.NET Framework) depending on the version you are using.
- Name your project (e.g., “TryCatchExample”) and click Create.
Step 3: Write the Code
- In the Program.cs file (which is automatically created when you create a new project), copy and paste the provided source code.
Step 4: Run the Program
- Press Ctrl + F5 or click Start Without Debugging from the menu.
- The console will open, and the program will ask you to enter two numbers.
- Try different inputs:
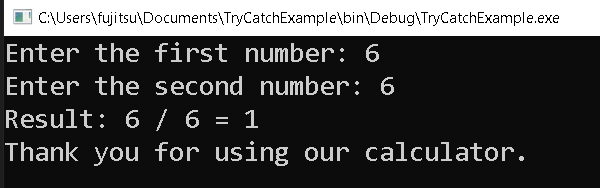
- Input valid numbers (e.g., 10 and 2) to see the correct division result.
- Input 0 as the second number to trigger the DivideByZeroException.
- Input non-numeric values (e.g., “abc”) to trigger the FormatException.
After each input scenario, the program will display appropriate messages and handle any exceptions gracefully.
Output
Summary
In this lesson, we explored the basics of exception handling in C# using the try-catch block. We learned how to handle common runtime errors such as division by zero and invalid input formats. Through a simple program, we demonstrated how the try block is used to execute potentially error-prone code, while catch blocks handle specific exceptions, preventing the program from crashing. We also introduced the finally block, which ensures that certain code always runs, regardless of whether an error occurred. This lesson helps beginners understand how to write more robust and error-resilient C# applications.
Exercises and Assessment
To help reinforce the concepts learned in this lesson, it’s important to practice and apply exception handling techniques in different scenarios. The following exercises, assessment, and lab exam will challenge you to improve the original source code and enhance your skills in writing error-resilient C# applications. By working through these tasks, you will gain hands-on experience with exception handling, ensuring your programs can gracefully handle a wide range of potential errors.
Exercises
- Handle More Specific Exceptions
Expand the existing code by adding a catch block to handle an OverflowException (e.g., when input exceeds the size limit for integers). Test this with extremely large values to ensure the exception is handled correctly. - Add User Input Validation
Before attempting to convert the input to an integer, check if the user input is empty or contains non-numeric characters. If it does, display a message asking the user to provide valid input, preventing the need for an exception. - Create a Loop for Continuous Input
Modify the code so that if the user enters an invalid number or attempts to divide by zero, the program asks for new inputs instead of terminating. The loop should continue until valid inputs are provided. - Include Exception Logging
Implement exception logging by writing the error details (e.g., exception type, message, stack trace) to a text file when an exception occurs. This will help in troubleshooting and understanding the issues in production.
Assessment
- Enhance Exception Handling for Multiple Operations
Update the program to allow the user to choose different mathematical operations (addition, subtraction, multiplication, division) and ensure exception handling is in place for each. For example, handle cases where invalid input affects operations like multiplication. - Add Custom Exception for Negative Numbers
Create a custom exception class that checks if any of the input numbers are negative. If a negative number is provided, throw your custom exception and display an appropriate message to the user. - Use Try-Catch in Functions
Refactor the main code by placing the division operation inside a separate function that uses try-catch to handle exceptions. This helps promote modularity and code reuse.
Quiz
1. What is the primary purpose of a try-catch block in C#?
A. To handle exceptions and prevent program crashes
B. To define custom data types
C. To create loops
D. To perform calculations
2. Which of the following is a common type of exception that can be handled using a try-catch block?
A. SyntaxException
B. DivideByZeroException
C. CompilationException
D. RuntimeEnvironmentException
3. Consider the following code:
try
{
int result = 10 / 0;
Console.WriteLine(result);
}
catch (Exception ex)
{
Console.WriteLine(“An error occurred: ” + ex.Message);
}
What will be the output of this code?
A. An error occurred: Division by zero.
B. 10
C. Compilation error
D. Runtime error
4. In a try-catch block, where should you typically place code that should always be executed, regardless of whether an exception is thrown?
A. Inside the try block
B. Inside the catch block
C. Inside the finally block
D. Outside the try-catch block
5. Which of the following is a best practice for using try-catch blocks in C#?
A. Catching all exceptions with a generic catch block
B. Using try-catch blocks for routine error checking
C. Using try-catch blocks to handle predictable exceptions
D. Avoiding the use of try-catch blocks altogether
Related Topics and Articles:
You may visit our Facebook page for more information, inquiries, and comments. Please subscribe also to our YouTube Channel to receive free capstone projects resources and computer programming tutorials.
Hire our team to do the project.